Virtualizing AWS OpsWorks with Vagrant (UPDATED)

Having recently made the switch from my old PaaS provider to AWS OpsWorks, I’ve resolved to take this opportunity to update my local development workflow along with it. My peers have been extolling the virtues of Vagrant for years, so it’s time to finally see what all the fuss is about.
Update — Feb 12th, 2015: Since recent updates to AWS OpsWorks broke my original workflow, the tutorial in this post has been altered significantly from the first posting. If you are looking for the original article, you can find it here. I have also further enhanced this workflow with a custom Packer template documented in my follow-up post “Simplify OpsWorks Development With Packer”.
Table of Contents
- Why Vagrant?
- Getting Started
- Virtualizing “Simple PHP App” Step 1 & 2
- Virtualizing “Simple PHP App” Step 3 - Adding a MySQL Layer
- Local Development and Deployment
- Custom Vagrant Boxes
- Going Forward / Final Notes
Why Vagrant?
Vagrant is an awesome tool for local web development. When used with a configuration management tool like Chef or Puppet, Vagrant can create a portable, consistant development environment to mirror your production server down to the last detail. No longer do you have to worry that an app which runs perfectly on your OSX machine’s LAMP stack will break down when you push it to EC2 due to subtle differences in your production server’s configuration. No longer do you have to juggle multiple versions of PHP or Python or Ruby on your local dev machine so that you can work on multiple projects with different dependencies.
Vagrant encloses your app within its own virtualized development environment, isolating it from your operating system and any other external influences and perfectly mimicking the environment in which you intend to deploy it.
Virtualizing OpsWorks
OpsWorks uses a custom chef zero configuration to provision its components, so to emulate the service we will take the same “opsworks agent” software package that OpsWorks uses to manage EC2 instances and install it locally. This agent includes the OpsWorks built-in cookbooks (which Amazon provides on GitHub) as well as the opsworks-agent-cli command (documented here) which can be used to run Chef recipes.
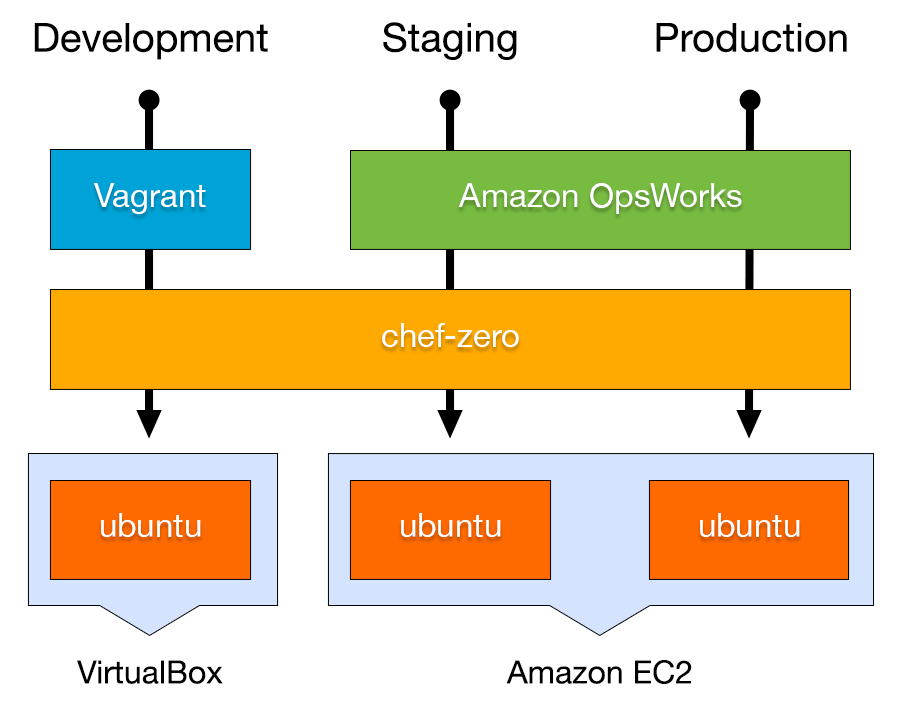
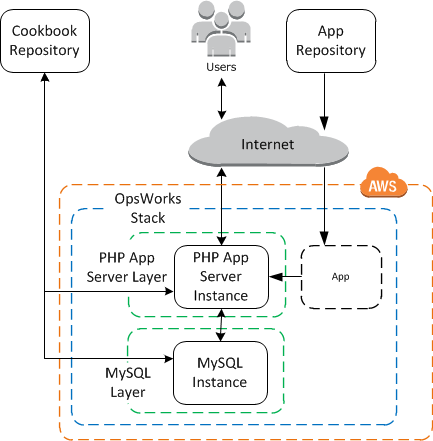
The resulting workflow will resemble the following diagram (thanks @buccolo):
Getting Started
For this walkthrough I’m going to follow Amazon’s OpsWorks tutorial “Getting Started: Create a Simple PHP Application Server Stack” and show you how to mirror the entire stack on a local machine step by step. If you have not done so, you may want to follow their tutorial first.
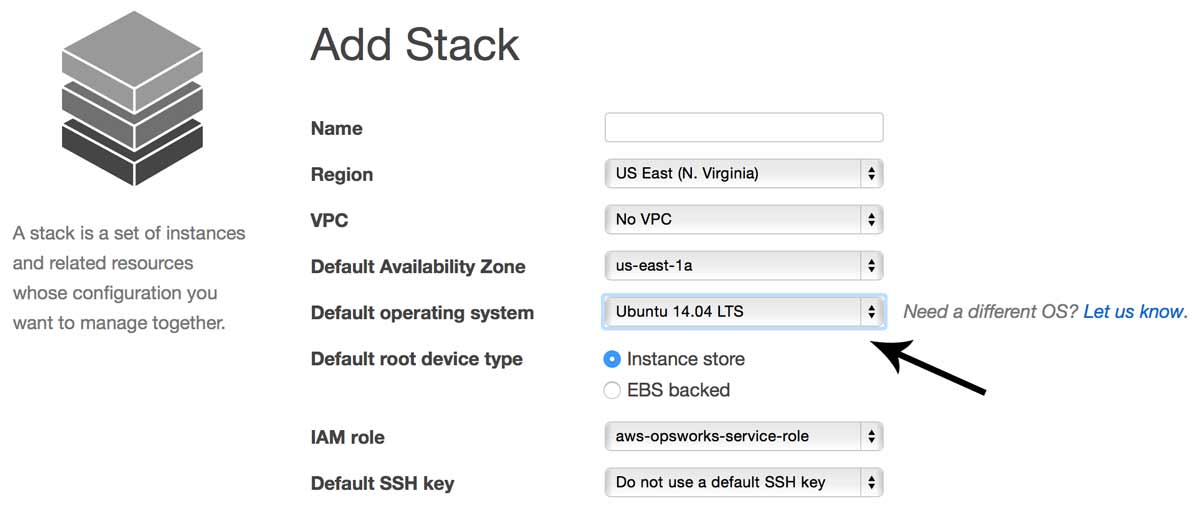
There are a few minor caveats to note here. First, Amazon Linux is not available outside of AWS (and you really shouldn’t use Amazon Linux anyway) so for true environment parity we need to use either Ubuntu 12.04 LTS or 14.04 LTS which are available universally. I will be using Ubuntu 14.04 “Trusty” for the remainder of this tutorial, but 12.04 will work fine also. Make sure to select it as your default operating system in step 2.1.
Note: All of the code used in this tutorial can be found on GitHub at https://github.com/pixelcog/opsworks-local/. If you want to skip ahead and play around with it you can simply clone it, install the dependencies, and run
vagrant up
Virtualizing “Simple PHP App” Step 1 & 2
Still here? Good.
After having completed the OpsWorks tutorial through step 2 your simple stack should look like this:
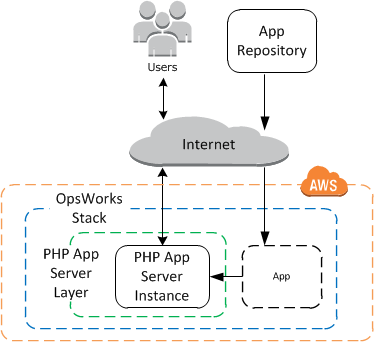
This is what we’re going to emulate first.
If you haven’t done so already, you’ll need to install Vagrant v1.7.0 or higher from from the official website, as well as the virtualization software VirtualBox. Both are free tools.
Now let’s create a directory to house this project.
mkdir opsworks-local && cd opsworks-local
mkdir -p dev ops/dna ops/provisioner
Now, lets clone the “simple php” app from the OpsWorks tutorial into our project directory.
git clone -b version1 https://github.com/amazonwebservices/opsworks-demo-php-simple-app.git dev/simple-php
Next, we’ll grab a virtualbox image of Ubuntu 14.04 and initialize our config file.
vagrant box add ubuntu/trusty64 --provider virtualbox
touch Vagrantfile
Open up Vagrantfile with your text editor of choice and let’s add some lines.
Vagrant.configure("2") do |config|

  # Set our operating system
  config.vm.box = "ubuntu/trusty64"

  # Configure our provisioner script
  config.vm.synced_folder 'ops/provisioner', '/tmp/provisioner'
  config.vm.provision :opsworks, type: 'shell' do |shell|
    shell.inline = '/bin/bash /tmp/provisioner/opsworks "$@"'
    shell.args = 'ops/dna/php-app.json'
  end

  # Forward port 80 so we can see our work
  config.vm.network "forwarded_port", guest: 80, host: 8080
end
This tells Vagrant to sync the directory at ops/provisioner/ and run a shell script from there called “opsworks”. This shell script will install opsworks-agent and bootstrap our provisioner which is found in the same directory alongside a few opsworks config files.
These files are too large to embed here, but you can grab all four files on this project’s github page or download them with the following command:
cd ops/provisioner
wget https://raw.githubusercontent.com/pixelcog/opsworks-local/version1/ops/provisioner/{opsworks{,.rb},client.yml,pre_config.yml}
cd -
Configuring Our Provisioner
Our Vagrantfile points the provisioner to the file ops/dna/php-app.json. This JSON file defines the attributes we pass into Chef when provisioning. This is like the “Custom JSON” field in your OpsWorks stack settings, though OpsWorks also silently adds its own attributes corresponding to your stack’s current configuration — The deploy key contains the information needed by our recipes to install and configure the app, and the opsworks_custom_cookbooks key gives Chef our recipe run list and tells it where to find any custom cookbooks we’re including (more on that later).
This is the heart of the configuration for this project. Let’s open it up and add a few lines:
{
  "deploy": {
    "simple-php": {
      "application_type": "php",
      "document_root": "",
      "scm": {
        "scm_type": "git",
        "repository": "dev/simple-php"
      }
    }
  },
  "opsworks_custom_cookbooks": {
    "recipes": [
      "recipe[opsworks_initial_setup]",
      "recipe[ssh_host_keys]",
      "recipe[ssh_users]",
      "recipe[mysql::client]",
      "recipe[dependencies]",
      "recipe[ebs]",
      "recipe[opsworks_ganglia::client]",
      "recipe[mod_php5_apache2]",
      "recipe[deploy::default]",
      "recipe[deploy::php]",
      "recipe[opsworks_ganglia::configure-client]",
      "recipe[agent_version]",
      "recipe[php::configure]"
    ]
  }
}
App Configuration
The first part of this JSON file, within the deploy hash, is synonymous with the OpsWorks “App” configuration, as seen below:
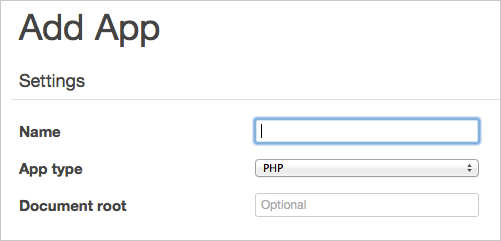
The name becomes the hash key simple-php, the app type becomes the application_type value, and the document root gets set to document_root.
After this we simply need to let opsworks know where our project code is located. Normally, you’d put a remote url under scm.repository, but if we use a local path in here, our provisioner will recognize it and pull from our local path instead, tricking the opsworks agent into treating it like a remote repository. Note that this local path must be a subdirectory of your Vagrantfile location as that is the only file tree your VM box will have access to by default. In this case, we’ve cloned our php project at dev/simple-php.
Layer Configuration
The second part of the JSON file is the opsworks_custom_cookbooks hash. Here we get to define our PHP layer’s run-list for Chef. OpsWorks “Layers” are essentially the same thing as Chef’s “Roles” concept. Each of the OpsWorks built-in layers have a set of default recipes. If you select a PHP layer in the OpsWorks console and click on “recipes”, you’ll see something like the following:
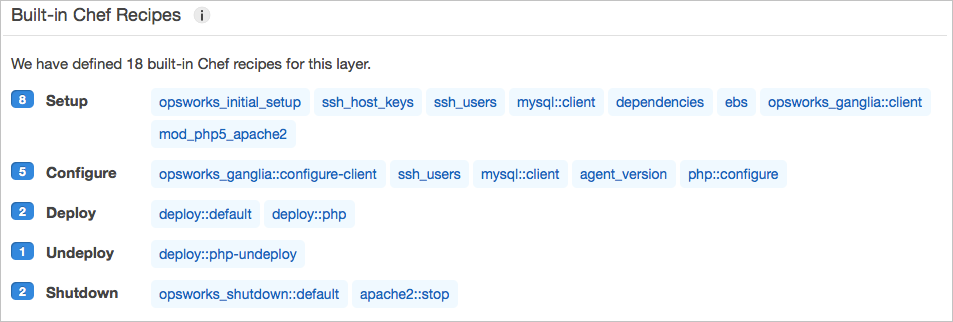
Vagrant has no concept of OpsWorks’ “Lifecycle Events“, so in order to provision and deploy our app, we must run the recipes within the Setup, Deploy, and Configure events in that order.
In our case, this works out to the following list, reflected in the recipes array in our JSON file:
opsworks_initial_setup
ssh_host_keys
ssh_users
mysql::client
dependencies
ebs
opsworks_ganglia::client
mod_php5_apache2
deploy::default
deploy::php
opsworks_ganglia::configure-client
agent_version
php::configure
If you’re lazy, you can clone all of this from GitHub at:
https://github.com/pixelcog/opsworks-local/tree/version1
Hello World
Now that we have configured our Vagrant stack, lets run it and test it.
vagrant up
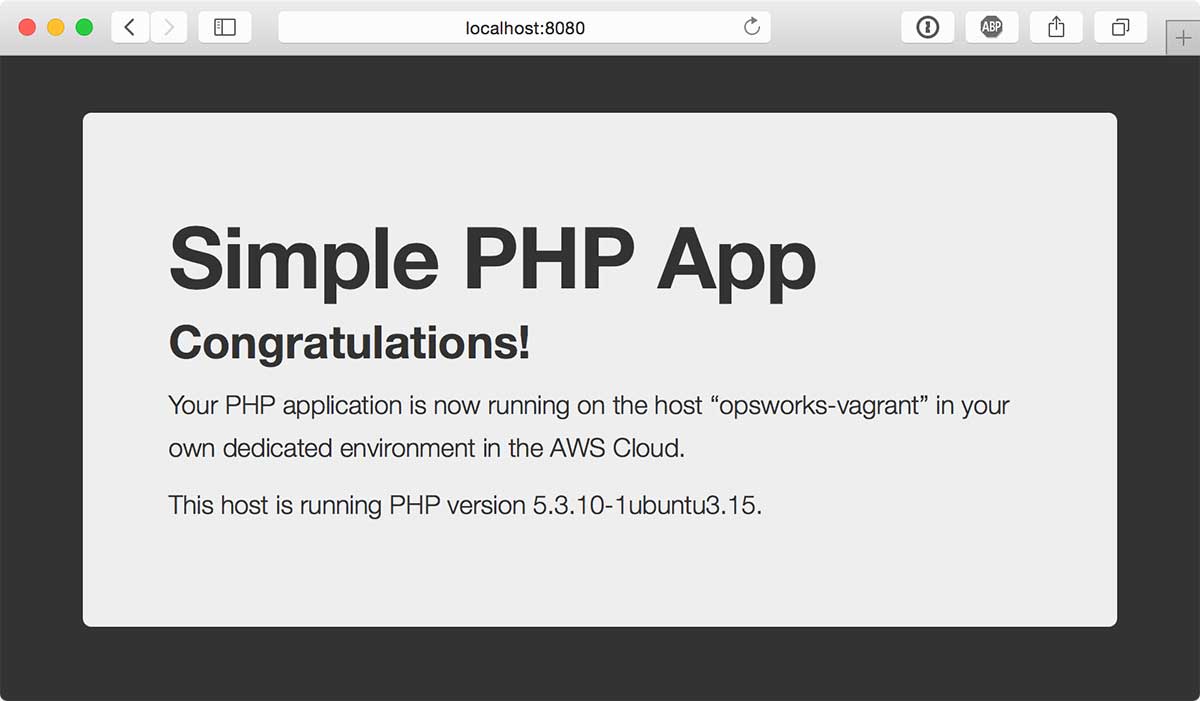
It’ll take a few minutes to provision everything, so go grab a coffee. If all goes well, you can then type localhost:8080 into your browser and voilà!
If you’re curious to see what just happened under the hood, you can go ahead and log in with vagrant ssh and then type sudo opsworks-agent-cli get_json to see exactly what our provisioner sent to the opsworks-agent. You’ll notice that it took php-app.json and attached a few additional attributes to it, filling out default values so that everything the OpsWorks built-in cookbooks expect to be there is present. Note that you can run the same command on your OpsWorks nodes on EC2 to see what data is getting sent to your live instances. This can be useful if you want to mirror your live configuration more precisely by inspecting the nuances in the JSON data. If you wanted to be really thorough, you could flesh out opsworks.instance, opsworks.stack, opsworks.layers, and deploy with all of the attributes OpsWorks uses in production. I’ve compiled an example attribute dump from a deploy lifecycle event on OpsWorks here.
Make sure to run vagrant halt and vagrant destroy when you are done to clean up and remove the virtual machine.
Virtualizing “Simple PHP App” Step 3 - Adding a MySQL Layer
Well that was neat and all, but it’s not really much of an app… Things get a lot more interesting when you add a database layer and a second virtualized machine.
After you complete step 3 of the OpsWorks tutorial your stack should look like this:
How do we model all of this in Vagrant? First, lets update our simple-php app to version2 and clone the opsworks custom cookbooks example from the tutorial into our ‘ops’ directory.
cd dev/simple-php
git checkout version2
cd -
git clone -b master git@github.com:amazonwebservices/opsworks-example-cookbooks.git ops/cookbooks
Now lets modify our Vagrantfile to include a second VM:
Vagrant.configure("2") do |config|

  # Set our operating system
  config.vm.box = "ubuntu/trusty64"

  # Configure our provisioner script
  config.vm.synced_folder 'ops/provisioner', '/tmp/provisioner'
  config.vm.provision :opsworks, type: 'shell' do |shell|
    shell.inline = '/bin/bash /tmp/provisioner/opsworks "$@"'
  end

  # Define our app layer
  config.vm.define "app" do |layer|

    layer.vm.provision :opsworks, type:"shell", args:[
      'ops/dna/stack.json',
      'ops/dna/php-app.json'
    ]

    # Forward port 80 so we can see our work
    layer.vm.network "forwarded_port", guest: 80, host: 8080
    layer.vm.network "private_network", ip: "10.10.10.10"
  end

  # Define our database layer
  config.vm.define "db" do |layer|

    layer.vm.provision :opsworks, type:"shell", args:[
      'ops/dna/stack.json',
      'ops/dna/db-master.json'
    ]

    layer.vm.network "private_network", ip: "10.10.10.20"
  end
end
Here, we’ve created two virtual machines, app and db, and assigned IP addresses to them on a private network. There are a couple of things to note here. We’re using a “named” provisioner in the root configuration so we don’t have to copy our provision command into both VMs. We simply reference the :opsworks provisioner inside each VM definition to add the JSON files as arguments. We’ve also split the arguments out into stack.json, php-app.json, and db-master.json. The provisioner will take any JSON files you give it and combine them before handing it off to Chef (attributes in later files override those in earlier ones if there are conflicts), so we’re able to put common attributes into stack.json and layer and instance-specific attributes into the other two files.
Updating JSON Configuration
Now we need to split out the php-app.json file into those attributes common to both VMs and those which are meant for the php app VM specifically. Let’s move the deploy hash from ops/dna/php-app.json to ops/dna/stack.json, and add a few things:
{
  "deploy": {
    "simple-php": {
      "application_type": "php",
      "document_root": "web",
      "scm": {
        "scm_type": "git",
        "repository": "dev/simple-php"
      },
      "memcached": {},
      "database": {
        "host": "10.10.10.20",
        "database": "simple-php",
        "username": "root",
        "password": "correcthorsebatterystaple",
        "reconnect": true
      }
    }
  },
  "mysql": {
    "server_root_password": "correcthorsebatterystaple",
    "tunable": {"innodb_buffer_pool_size": "256M"}
  },
  "opsworks": {
    "layers": {
      "php-app": {
        "instances": {
          "php-app1": {"private-ip": "10.10.10.10"}
        }
      },
      "db-master": {
        "instances": {
          "db-master1": {"private-ip": "10.10.10.20"}
        }
      }
    }
  },
  "opsworks_custom_cookbooks": {
    "enabled": true,
    "scm": {
      "repository": "ops/cookbooks"
    }
  }
}
Note that we’ve updated the document_root to “web” (as specified in step 3.2), and we’ve added the IP address and connection info for our database VM to the deploy hash (the mysql root password attribute should match whatever password is specified here). The opsworks.layers attributes exist so our nodes know how to find each other, and scm.repository under opsworks_custom_cookbooks tells opsworks how to find the custom cookbooks which we just cloned to ops/cookbooks/. Lastly, setting the tunable.innodb_buffer_pool_size attribute is a hack to get MySQL to work on a VM which has far less available memory than a normal EC2 instance would have (VirtualBox’s default is 512MB).
For the db VM configuration, let’s look at the OpsWorks default recipes for the built-in MySQL layer:
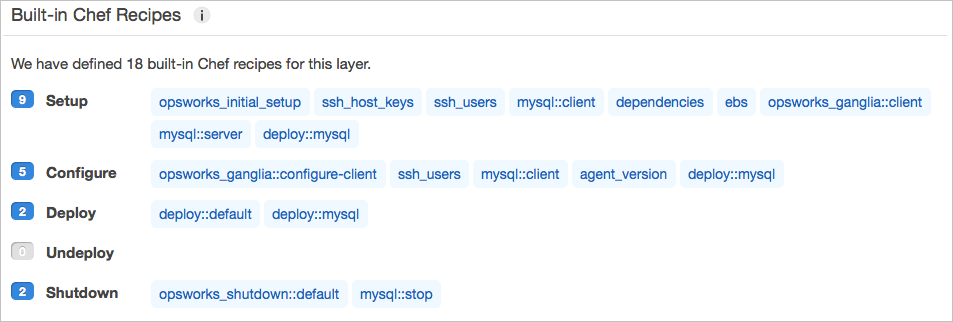
We can add the phpapp::dbsetup custom recipe (as in step 3.4 of the OpsWorks tutorial) and mirror this run list in ops/dna/db-master.json like so:
{
  "opsworks_custom_cookbooks": {
    "recipes": [
      "recipe[opsworks_initial_setup]",
      "recipe[ssh_host_keys]",
      "recipe[ssh_users]",
      "recipe[mysql::client]",
      "recipe[dependencies]",
      "recipe[ebs]",
      "recipe[opsworks_ganglia::client]",
      "recipe[mysql::server]",
      "recipe[deploy::mysql]",
      "recipe[phpapp::dbsetup]",
      "recipe[opsworks_ganglia::configure-client]",
      "recipe[agent_version]"
    ]
  }
}
Lastly, the remainder of our php-app.json file should now contain just the recipe run list for the app layer, plus the additional custom recipe phpapp::appsetup (again as in step 3.4 of the OpsWorks tutorial):
{
  "opsworks_custom_cookbooks": {
    "recipes": [
      "recipe[opsworks_initial_setup]",
      "recipe[ssh_host_keys]",
      "recipe[ssh_users]",
      "recipe[mysql::client]",
      "recipe[dependencies]",
      "recipe[ebs]",
      "recipe[opsworks_ganglia::client]",
      "recipe[mod_php5_apache2]",
      "recipe[deploy::default]",
      "recipe[deploy::php]",
      "recipe[phpapp::appsetup]",
      "recipe[opsworks_ganglia::configure-client]",
      "recipe[agent_version]",
      "recipe[php::configure]"
    ]
  }
}
The complete code for this step can be found here.
Hello World — Part 2
We’re now ready to boot our environment.
vagrant up
Wait a few minutes for the provisioner to do its thing and if all goes well, you can then go to localhost:8080 and be greeted with something similar to this:
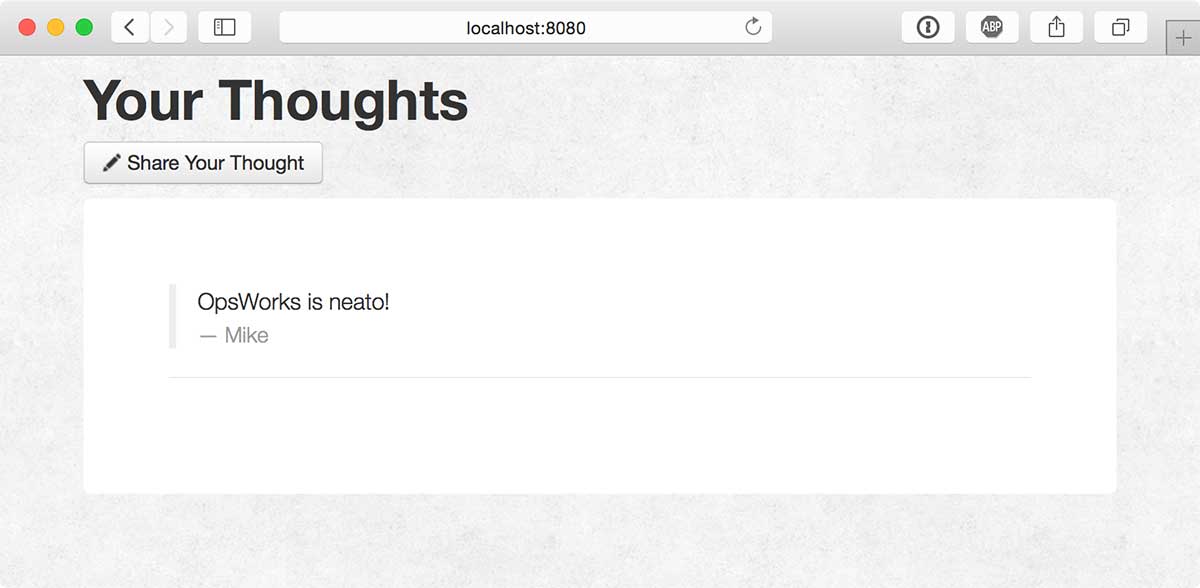
Huzzah!
Local Development and Deployment
Now the way deployment works here is pretty straight forward. You can make any set of changes to the app contained within dev/simple-php/ and run vagrant provision app to deploy the changes. This will re-execute all of the recipes on the app instance and apply all necessary bootstraping through the custom deploy recipes.
cd dev/simple-php
echo "<?php phpinfo(); ?>" > web/info.php
vagrant provision app
The provisioner process will go much faster the second time around since the only thing that is changing is the app deployment.
Alternatively if you want to have your changes reflected immediately on the development server without running the provisioner each time, you can log into the server and symlink the shared folder to the live environment
vagrant ssh app
ln -sfn /vagrant/app/simple-php /srv/www/simple-php/current
Note that when you do this, you’ll have to do your bootstrapping manually (essentially all of the stuff contained in the “phpapp::appsetup” custom recipe). In the case of this app, you’d need to do the following (still logged into the guest machine):
cd /srv/www/simple-php/current
curl -sS https://getcomposer.org/installer | php
php composer.phar install --no-dev
Then add a the file “db-connect.php” with the following:
<?php
  define('DB_NAME', 'simple-php');
  define('DB_USER', 'root');
  define('DB_PASSWORD', 'correcthorsebatterystaple');
  define('DB_HOST', '10.10.10.20');
  define('DB_TABLE', 'urler');
?>
Now you can modify whatever you want and have the changes reflected immediately.
Each of these deployment options are nice for different scenarios. When actively developing your app, saving yourself from reprovisioning each time you want to test it out is quite handy. However the former option gives you an opportunity to debug your deploy recipes if you have any.
The way I’ve chosen to handle this is to create a custom deploy recipe which does all of the symlinking and bootstrapping for me whenever it is run on a development machine (using a custom attribute passed in through the JSON in the deploy hash).
Custom Vagrant Boxes
To further enhance this workflow, I have created a Packer template for Vagrant which can be used to pre-load a Vagrant box with the OpsWorks agent and my provisioner script, speeding up the first vagrant up process by several minutes and making configuration a lot simpler. You can find this documented on my follow up post “Simplify OpsWorks Development With Packer”.
Going Forward / Final Notes
In the future I would really like to take my provisioner shell script and turn it into a full fledged Vagrant plugin which would allow you to use a simple Vagrantfile config to automatically generate the necessary OpsWorks JSON attributes in a similar way to the OpsWorks web interface. As it stands, there is a lot of manual JSON file management, and if you write a custom recipe which relies on additional custom attributes, you’ll need to add them to the JSON yourself.
I will follow this post up with some additional tips and tricks as I experiment more with the platform.